Mountain Bike Tire Pressure: A Practical How-To Guide
A practical, step-by-step guide to checking and adjusting mountain bike tire pressure for better traction, control, and puncture protection across varied terrain.

This guide helps you check mountain bike tire pressure, adjust for terrain, and maintain tubeless or tubed setups with a simple, step-by-step approach. You'll learn how to measure pressure accurately, interpret sidewall markings, and avoid common mistakes that reduce grip or cause flats. Start with a quick routine and ride confidently on rugged trails.
Why mountain bike tire pressure matters
The way you set tire pressure on a mountain bike influences grip, stability, rolling efficiency, and the risk of flats. On rugged trail surfaces—loose soil, gravel, roots, and exposed rock—the tire's contact patch changes shape with pressure, affecting how the tire grips and absorbs vibrations. According to Tire Pressure Tips, optimizing mountain bike tire pressure is a practical, terrain-tuned skill that doesn't require expensive gear. The Tire Pressure Tips team found that tiny pressure changes can shift handling dramatically: too high and the tire skates over soft ground; too low and it squats, increasing the chance of pinch flats on hard edges. The goal is to strike a balance between flotation over soft sections and sufficient sidewall support on rough terrain. A well-chosen pressure helps your tire bead stay seated, reduces heat buildup, and allows your suspension to do its job more effectively. If you ride with a pump that has a gauge, you can measure the pressure before every ride, especially when you switch tires or adjust tire width. Tire Pressure Tips analysis, 2026, emphasizes using the tire's stated range on the sidewall as a starting point and then dialing in with gradual changes. Keep in mind that rider weight, bike setup, and terrain type all shape the final target; there is no one-size-fits-all number, only a reliable starting point and a repeatable check routine.
Understanding tire construction and sidewall markings
Mountain bike tires come in a variety of widths, casings, and construction styles that influence how pressure behaves. The sidewall markings on a tire tell you the nominal width, the recommended pressure range, and whether the tire is tubed or tubeless-ready. Look for ranges printed as max and min pressures or as a range for your tire width. If you ride tubeless, you may be able to run lower pressures without risking pinch flats because the bead seat and sealant provide added support; for tubed tires, you usually need a bit more bead rigidity to avoid pinch flats if you hit sharp edges. Many tires also include a 'rim-tire fit' indicator and information about recommended pressure depending on rider weight. When in doubt, start with the mid-point of the tire's stated range and adjust after a short ride. If you have a scale for weight distribution, note how much weight sits on the front vs the rear; front-heavy riders may prefer slightly different front pressure than rear to maintain balanced handling. Always verify whether your tire is designed for tube-type systems or tubeless setups; the pressure management strategy changes with the system.
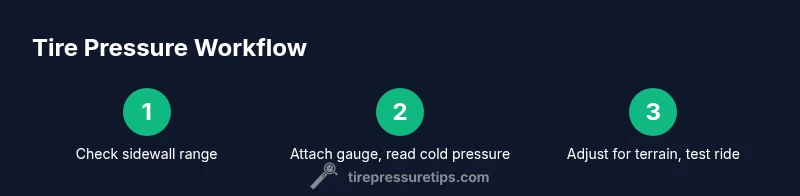
How to check tire pressure accurately
Checking tire pressure accurately is the foundation of good tire management. Start with a reliable gauge—dial gauges are very precise, while digital gauges are fast to read. Attach the gauge to the valve stem and ensure a proper seal before taking a reading. If your gauge shows a different number on different days, calibrate by zeroing the gauge on a fixed reference before testing. Remove the cap, seat the valve, and gently press the gauge to avoid air escaping; if air leaks around, reseat and try again. Temperature matters: pressure rises when the tires heat up from riding, so measure when the tire is cold for a consistent baseline. For tubeless setups, you may hear a brief hiss during measurement if the bead is loose; this is normal as you collect data from the gauge. If your bike has a TPMS (tire pressure monitoring system), cross-check the digital readout with your manual gauge to confirm accuracy. After inflating or adjusting, recheck within a minute to confirm the final depth of the bead against the rim. Finally, document your preferred pressures for each terrain you ride—this habit makes dialing in faster with future rides.
Terrain-aware pressure guidelines for mountain biking
On mountain trails you’ll encounter a spectrum of surfaces: soft loam, chunky rock gardens, steep chutes, and hard-packed dirt. A single tire pressure rarely fits all conditions, so riders adopt terrain-aware dialing between the middle of the tire's range and fine-tune by feel. For soft, loose sections like mulch or sand, a lower pressure increases the tire's contact patch and helps the tread bite into the substrate. On hardpack and rocky sections, a slightly higher pressure reduces tire squirm, improves steering precision, and minimizes the chance of rim impacts. In aggressive riding, many riders favor a narrower contact patch for quick steering and to prevent the tire from folding under lateral loads; in gnarly terrain with roots and shale, more tire volume can help absorb the impact. If you’re a weight-conscious rider or using a wider tire, you may find you can drop pressure further for flotation while still avoiding pinch flats in the event of a hit. The best approach is to set a baseline value at the start of a ride and adjust in small increments after a short test ride. Repeat this for different trail types, recording what works best for your weight, bike setup, and suspension.
Tubeless vs tubed: how pressure choices change
Tubeless tires have changed how riders think about pressure because sealant and bead design reduce pinch flats and bead failures at lower pressures. If you run tubeless, you can often run a bit lower pressure on rough surfaces without the fear of beads unseating; this helps you float over small obstacles and maintain traction on loose dirt. Tubed tires, however, rely more on bead seating against the rim; pressure must be high enough to prevent pinch flats when you hit a rock or root; you’ll typically run slightly higher pressure than tubeless setups for equivalent tire width and rider weight. When combining tubeless setups with pressure adjustments, be mindful of the risk that the sealant may dry over time, reducing sealing efficiency; check sealant levels and replace as recommended. If you switch from tubed to tubeless, allow some time for the beads to seal after inflating to the desired pressure. The choice between tubed and tubeless also interacts with tire width: wider tires tend to benefit from lower pressure for traction, while narrower tires require a careful balance to avoid rim strikes. In all cases, reference your tire manufacturer's guidelines and your suspension tune to decide the best target pressure for each ride.
Temperature, weather, and pressure: riding through the seasons
Air temperature and ambient conditions subtly change tire pressure, so seasonal swings can feel like a shift in ride quality even if you didn’t touch the gauge. In cold weather, air inside the tire contracts; pressures drop and grip may feel mushier, especially on rocky trails. In hot weather or after a long downhill run, the air warms and expands, pushing pressure higher and making the tire feel firmer. On long climbs or hot days, you may need to recheck pressure at rest stops to ensure you’re not chasing a rising or falling baseline. If you have a TPMS, watch the real-time readouts as you ride through shade and sun; verify any sudden changes with a hand-held gauge when you stop. The key is to treat temperature as a dynamic factor rather than a fixed target. Before starting a ride, check the baseline in a controlled environment (garage or shade) and carry a compact gauge to verify pressure at mid-ride stops if terrain or weather changes drastically. By building a simple routine that accounts for temperature swings, you’ll keep traction consistent and avoid overinflation in heat or underinflation in cold snaps.
Common mistakes and how to avoid them
Even experienced riders fall into the same traps when it comes to tire pressure. Common mistakes include inflating to the maximum range on the sidewall without testing on actual terrain, relying solely on a TPMS reading without cross-checking with a manual gauge, and changing pressure only when you feel a difference rather than checking regularly. Another frequent misstep is assuming the same pressure works for front and rear tires; weight distribution and suspension setup often require different pressures per tire. Don’t neglect seasonal changes; pressure you set in summer may feel off in winter, causing grip and stability to suffer. A helpful habit is to mark your preferred pressures on a sticker inside your frame or a notes app on your phone so you can quickly recall the baseline before a ride. Finally, avoid using a low-quality gauge; invest in a reliable tool, calibrate it periodically, and replace it if readings drift. The result is a consistent feel across all terrains, with predictable cornering and fewer flats.
A simple maintenance routine you can start today
Create a short pre-ride pressure-check ritual that takes less than five minutes. Start by inspecting tires for cuts or embedded objects, then check the sidewall markings for the recommended range. Use a reliable gauge and a floor pump to measure and adjust to the baseline pressure you tested on similar terrain. After inflating, recheck within a minute to confirm the bead is seated and the gauge reads the same value. If you frequently ride tubeless, inspect bead seal and sealant level periodically; top up sealant if you see signs of dryness or bead leaks around the rim. Finally, record your targets for front and rear tires across the terrain you ride most—this will speed up future adjustments and help you maintain consistent grip and rolling efficiency over time.
Quick-start routine you can adopt this weekend
Keep this simple routine on hand for your next ride: 1) Check both tires with a gauge; 2) Set pressure to your baseline range from the sidewall; 3) Take a short lap to test grip and ride feel; 4) Adjust by small amounts and recheck; 5) Note what worked and refine your baseline for the next outing. This approach balances reliability with experimentation, so you can find your personal sweet spot without spending hours fine-tuning. For riders who want a repeatable workflow, use a notebook or app to log tire widths, rider weight, and terrain types alongside the pressures you used. The result is a practical system you can rely on for every ride, whether you’re conquering a flow trail or entering a rocky climb.
Tools & Materials
- Bike floor pump with gauge(Choose a pump with an integrated gauge and a compatible valve head (Presta or Schrader).)
- Tire pressure gauge (dial or digital)(Aim for ±1 psi accuracy; calibrate regularly against a known reference.)
- Valve caps(Keep caps on to protect valve cores; replace if damaged.)
- Soapy water (optional)(For tubeless setups, test bead seal by watching for leaks at the rim bead.)
- Cloth or rag(Wipe off dirt from valve stems before attaching gauges.)
Steps
Estimated time: 15-25 minutes
- 1
Check tire markings and baseline range
Inspect the sidewall for the manufacturer’s pressure range and any tubeless/tubed notes. This creates your starting point and reduces guesswork. If the range is broad, aim for the middle as a safe initial target and plan to adjust after a short ride.
Tip: If unsure, start at the mid-point of the range and note how the bike feels on a familiar section. - 2
Prepare tools and clear the valve
Remove the valve cap, wipe the valve stem, and ensure you have a clean seal before attaching the gauge. This prevents false readings and dirt from entering the valve.
Tip: Keep the gauge close; a quick, clean connection improves accuracy. - 3
Attach gauge and measure cold pressure
Seat the gauge on the valve stem firmly to avoid air leakage, then read the pressure with the tire cold. If the number seems off, re-seat and test again. Cold baselines produce more repeatable results.
Tip: If the gauge reads low on both tires, recheck for a loose valve head rather than inflating blindly. - 4
Adjust toward terrain baseline
Begin with a small adjustment toward the terrain baseline; test with a short ride to evaluate grip, control, and comfort. Make incremental changes rather than large jumps to maintain safety.
Tip: Test ride a short loop, focusing on cornering grip and stability over rough patches. - 5
Recheck and confirm bead seating
After adjusting, recheck pressure within a minute to confirm stability and ensure the bead is seated. Uneven readings can indicate a seating issue or valve problem.
Tip: If you notice a lingering hiss, reseat the bead and recheck again. - 6
Document your terrain-based targets
Record front and rear pressures for common terrain types (soft, medium, hard) so you can quickly reproduce your best setup on future rides.
Tip: Use a notebook or app to track weight, tire width, and suspension setup with each target.
Frequently Asked Questions
How often should I check mountain bike tire pressure?
Check before each ride to establish a reliable baseline and recheck if temperature or terrain changes. If you ride daily or in variable conditions, a quick mid-ride check can help maintain grip.
Check before every ride, and recheck if conditions change. A quick mid-ride check can help keep grip consistent.
Can I run different pressures on front and rear tires?
Yes. Many riders run different pressures to balance weight distribution, steering, and suspension behavior. Start with small asymmetry and adjust based on feel after a short test ride.
Yes, you can run different pressures on front and rear tires. Start with small adjustments and test.
What happens if I ride with too low pressure?
Riding too low can increase traction but raises the risk of pinch flats, bead unseating, and rim strikes if you hit sharp edges. It also makes cornering feel soft and unstable on hard surfaces.
Too low pressure can give more grip but may pinch the tire or cause rim hits. Be cautious.
What about tubeless vs tubed tires for pressure?
Tubeless setups tolerate lower pressures with reduced pinch-flat risk, improving traction on loose ground. Tubed tires usually require a bit higher pressure to prevent bead pinch, especially on rough trails.
Tubeless tires can run lower pressure with less pinch risk; tubed tires often need a bit higher pressure.
How does temperature affect tire pressure?
Air expands with heat and contracts with cold. Temperature swings can change pressure enough to affect grip, so recheck after exposure to different conditions.
Temperature changes can shift your tire pressure; recheck after warm or cold conditions.
Do TPMS systems help MTB riders?
Some MTB setups, especially e-bikes, include TPMS or end-user gauges. Use TPMS as a guide but confirm readings with a handheld gauge for accuracy.
TPMS can help, but verify with a handheld gauge for accuracy.
How should I record my tire pressure targets?
Keep a simple log of tire width, rider weight, terrain type, and the target pressures that work best. This creates a repeatable baseline for future rides.
Keep a simple log of your pressures, width, and terrain to repeat successful setups.
Is it safe to ride with tubeless sealant in the tire?
Tubeless sealant is generally safe for MTB tires but check the sealant level and seal to prevent leaks. Replace sealant per manufacturer recommendations to maintain optimal sealing.
Tubeless sealant is generally safe, but check levels and replace as recommended.
Watch Video
What to Remember
- Start with the tire's recommended range as a baseline.
- Use a reliable gauge and pump for accurate measurements.
- Tune pressure for terrain, rider weight, and tire width.
- Recheck after temperature changes or long rides.
- Log your targets to speed future adjustments.