Bike Tire Pressure Chart: Practical Guidelines for Riders
Learn how to use a tire pressure chart bike to set safe, efficient pressures by tire width, bike type, and load. Get reading tips, temperature adjustments, and maintenance guidance from Tire Pressure Tips.

A tire pressure chart bike is a reference table that maps tire width and bike type to a starting pressure. By matching your tire size (e.g., 25 mm road or 2.25 in mountain tires) and your load, you can pin down a safe pressure range and then fine‑tune based on ride feel and terrain. This approach helps prevent pinch flats and improves grip and efficiency.
What a tire pressure chart bike is and why it matters
A tire pressure chart bike is a practical reference that translates tire width, bike category, and load into a starting pressure. For riders who want consistency across rides, it replaces guesswork with data-backed baselines. According to Tire Pressure Tips, these charts come in many forms—from manufacturer sheets to community-contributed tables—and all share a simple goal: keep the tire within a safe, efficient pressure window.
The Tire Pressure Tips team found that following a chart helps reduce pinch flats on rough pavement, improve grip on wet roads, and stabilize rolling resistance over long distances. By starting with a recommended range rather than a single number, you leave room to fine-tune for personal preference, ground conditions, and gear carried. The charts are especially valuable for new riders who are building a mental model of how width and weight interact with air pressure. They also make it easier to communicate with shops or teammates about recommended setups.
Reading a bike tire pressure chart: key columns and values
Most tire pressure charts present a few core columns: bike type, tire width, rider weight/load, and a recommended pressure range in psi (or bar). Some charts include a temperature modifier or notes about tubeless versus tubed setups. When you read the chart, locate your tire width and bike category; then read across to the pressure range. A common pattern is a broader range for wider tires and a narrower band for narrow road tires. For example, a 25 mm road tire tends toward higher pressures, while a 38–42 mm gravel tire sits lower yet still focused around a mid-range value. Use the middle of the range as a starting point and adjust after a brief test ride.
How to apply the chart to your bike: step-by-step
Step 1: Determine your tire size (width) and your bike type. Step 2: Check your load (rider weight and gear) and expected terrain. Step 3: Find the corresponding range on the chart and pick the midpoint as a baseline. Step 4: Inflate with a reliable gauge to that baseline and ride a short loop to assess grip and comfort. Step 5: If you notice squirm or pinch flats on smooth sections, raise pressure slightly; if you feel excessive sway or poor traction, reduce slightly. Throughout, keep an eye on temperature and frequently re-check.
Factors that shift recommended pressure
- Tire width: Narrow tires require higher pressures; wider tires lower.
- Rider weight and load: Heavier riders require higher end of range.
- Terrain and riding style: Fast roads vs rough trails.
- Temperature and season: Pressure increases with heat; decreases with cold.
- Tubeless vs tubed: Tubeless setups can tolerate slightly lower pressures for grip.
Practical takeaway: start with the chart baseline, then tailor the pressure to ride feel and safety. Temperature swings, loaded backpacks, and riding style all push you toward small but meaningful adjustments.
Using a tire pressure chart bike with gear and accessories
A chart is a starting point, not a fixed rule. Use a reliable gauge and pump with a built‑in gauge to verify numbers. If you’re riding tubeless, you may run slightly lower pressures to improve traction, but verify seat‑of‑the‑pants feel with a quick road test. Keep a small log of pressures for different rides to build your personal baseline. After tire changes or wheel upgrades, revisit the chart and re‑test. Brand notes from Tire Pressure Tips emphasize consistency and verification over time.
Common mistakes when following a chart
- Treating the chart as a single number rather than a range.
- Ignoring temperature changes and re-checking after hot or cold days.
- Forgetting to re‑check pressures after tire or wheel changes.
- Relying on a gauge that hasn’t been calibrated.
- Over‑thinking: sometimes a small tweak and a brief test ride are enough to optimize grip.
Practical examples: 3 scenarios
-
Road bike with 25 mm tires, rider ~70 kg, light gear: start around 95 psi and adjust to feel. A mid‑range value in the chart often yields the best balance of speed and comfort.
-
Gravel bike with 38 mm tires, rider ~85 kg, modest cargo: baseline around 70 psi; you may settle between 60–75 psi depending on terrain and load.
-
Mountain bike with 2.25–2.4 inch tires, rider ~90 kg, backpack: baseline in the 30–40 psi range; adjust upward for smoother dirt sections and downward for aggressive climbs with high traction.
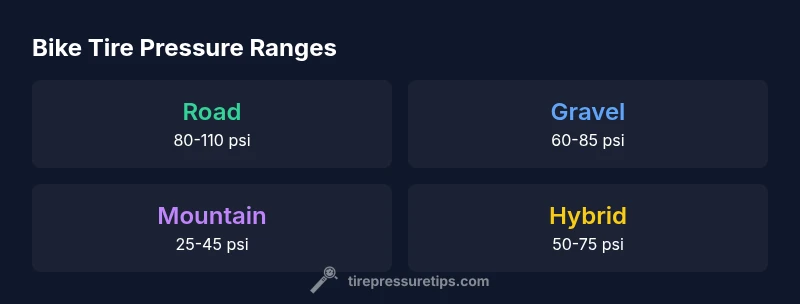
Representative ranges by bike type and tire width
| Bike Type | Tire Width (mm) | Recommended Pressure (psi) |
|---|---|---|
| Road bike | 23-28 | 80-110 |
| Gravel/Adventure | 32-50 | 60-85 |
| Mountain bike | 50-60 | 25-45 |
Frequently Asked Questions
What is a tire pressure chart bike?
A tire pressure chart bike is a reference table that matches tire width and bike type to a starting pressure, helping riders set a baseline before fine‑tuning based on conditions. It reduces guesswork and improves consistency.
A tire pressure chart is a starting point for setting bike tire pressure. Then you tune it based on how it feels on your ride.
How do I read a bike tire pressure chart?
Locate your tire width and bike type on the chart, then read across to find the pressure range. Use the midpoint as your baseline and test ride to confirm.
Find your tire size and bike type on the chart, pick the middle pressure, and test ride to fine‑tune.
Does riding with pressure outside chart ranges harm tires?
Yes, consistently riding outside recommended ranges can increase pinch flats or reduce grip. Adjust gradually and test after each change.
Going far outside the range can hurt grip or cause flats; adjust slowly and test.
Can tubeless tires use a different chart than tubed tires?
Tubeless tires often tolerate slightly lower pressures for similar grip. Check manufacturer guidance and adjust using the chart as a baseline.
Tubeless tires can run a bit lower, but follow manufacturer guidelines and verify with a gauge.
How does temperature affect tire pressure?
Air pressure rises with heat and falls with cold. Expect noticeable changes with weather, and recheck pressures after temperature shifts.
Weather changes can nudge tire pressure; recheck after warm or cold days.
What tools do I need to apply a chart?
A reliable pressure gauge and a pump with gauge are essential. Calibrate gauges regularly and carry spares.
Get a good gauge and pump; calibrate them and keep a log of pressures.
“Following a tire pressure chart provides a solid baseline, but the real value comes from testing and tuning for your ride, weight, and terrain.”
What to Remember
- Start with a documented baseline from the tire pressure chart bike.
- Match the chart to tire width and bike type, then adjust by feel.
- Account for temperature and terrain when finalizing pressure.
- Use a reliable gauge and calibrate regularly.
- Recheck pressure after tire or rim changes and after weather shifts.
- Keep a lightweight pressure log to build your personal baseline.
- Tubeless setups may allow slightly lower pressures for similar grip.
- Avoid relying on a single number; treat charts as ranges and test ride.