SRAM Tire Pressure Calculator: A Practical Guide for Bike Tires
Learn how to estimate optimal SRAM tire pressure with a practical calculator. Input weight, tire width, and temperature to get a safe pressure range and practical tips for road and MTB SRAM tires.

The educational model behind the SRAM tire pressure calculator
The SRAM tire pressure calculator is designed as an educational tool that demonstrates how rider load, tire width, and ambient temperature influence tire pressure for SRAM bicycle tires. It uses a simplified proportional model to illustrate the physics of pressure and contact patch while respecting manufacturer guidelines. According to Tire Pressure Tips, using a calculator to estimate safe pressures can help riders avoid pinch flats and improve rolling efficiency, but it should complement, not replace, the official tire spec. This tool provides a transparent, easy-to-understand approach so you can see how each input shifts the recommended pressure range and why small changes in temperature or load can matter on different terrains.
- Practical, learner-friendly math that clarifies the relationship between load, tire size, and pressure
- Clear warnings that numbers are starting points and must be checked against official specs
- Aiming to empower riders to tune pressures confidently with real-world scenarios
The key inputs you’ll need for SRAM tire pressure calculations
To get meaningful results from the SRAM tire pressure calculator, gather a few essential inputs before you begin. First, determine the Total Load ( rider plus gear ) in kilograms. Next, note the Tire Width in millimeters for the tire you’re using. Finally, capture the Ambient Temperature in degrees Celsius, since air pressure is temperature-dependent. In most cases, these three inputs are enough to generate a practical starting range. If you ride in extreme temperatures, carry a gauge and re-check feet before long rides. For road tires, a typical starting range will differ from MTB tires, so use this tool to compare scenarios. Remember: this calculator is an educational aid, not a substitute for manufacturer guidelines or a professional bike fit. Tire Pressure Tips highlights that precise pressures depend on the tire construction, rim profile, and riding style.
The underlying calculation model: a simplified educational approach
The calculator uses a straightforward, teachable formula that demonstrates how inputs affect pressure. It defines two end-points of a recommended range and then reports a midpoint as a practical starting point. The steps are as follows:
- Compute a low pressure estimate: lowPressure = round(max(20, min(120, (totalWeightKg * 0.8) + (tireWidthMm * 0.5) - (ambientTempC * 0.3))))
- Compute a high pressure estimate: highPressure = round(min(180, max(40, (totalWeightKg * 1.2) + (tireWidthMm * 0.8) - (ambientTempC * 0.2))))
- Derive a practical midpoint: midpoint = round((lowPressure + highPressure) / 2)
The final displayed value is the midpoint, which provides a sensible starting point that you can refine with on-bike checks and manufacturer specs. The numbers illustrate the direction and magnitude of change when inputs vary, rather than providing an exact prescription for every tire model.
Real-world examples: road bike vs gravel/gravel SRAM tires
Consider three scenarios to see how inputs influence the calculator’s output. These are educational illustrations, not exact prescriptions from a tire manufacturer:
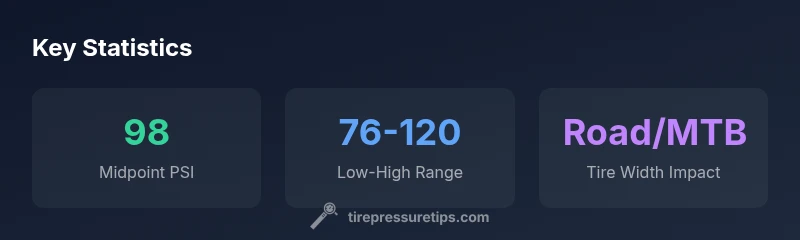
- Road SRAM tires, 28mm width, rider 85 kg, ambient 20°C: lowPressure ≈ 76 psi, highPressure ≈ 120 psi, midpoint ≈ 98 psi. This aligns with common road tire practice where higher pressures reduce rolling resistance on smooth surfaces.
- Gravel SRAM tires, 38mm width, rider 95 kg, ambient 25°C: lowPressure ≈ 90 psi, highPressure ≈ 150 psi, midpoint ≈ 120 psi. Wider tires generally tolerate higher pressures in this simplified model while offering more float on loose surfaces.
- MTB SRAM tires, 60mm width, rider 100 kg, ambient 30°C: lowPressure ≈ 110 psi, highPressure ≈ 170 psi, midpoint ≈ 140 psi. In reality, MTB tires typically run much lower pressures, but the example shows the model’s trend with very wide tires and heavier loads.
Note: Real-world pressures depend on tire construction, rim width, tubeless setup, and manufacturer guidelines. Always cross-check with official specs and perform on-bike testing for comfort and traction.
How to use the results on the bike: from numbers to action
Turning a calculated midpoint into a practical ride setting requires a few careful steps:
- Start at the midpoint value and check against the tire’s sidewall range. If the midpoint sits outside the recommended range, adjust toward the closest limit within the sidewall spec.
- Align with riding conditions. On smooth pavement with narrow tires, stay toward the higher end of the range for efficiency. On rough roads or gravel, consider stepping toward the lower end to widen the contact patch and gain grip.
- Check your gauge and verify multiple times. Always use a reliable gauge and calibrate it periodically to ensure accuracy. Temperature can swing pressures by a few psi, so re-check after warm-up or long descents.
- Factor tire pressure goals. If you prioritize rolling efficiency for speed, aim closer to the upper-middle of the range; if traction is critical, lower within the range can help with grip. Remember to re-check after tire installation or changes in tire width.
Safety reminders and maintenance checks
The educational model used by the SRAM tire pressure calculator is a tool to illustrate trends, not a substitute for safety checks. Always observe the tire sidewall maximum pressure and follow the tire manufacturer’s explicit instructions. Keep gauges calibrated, avoid underinflation (which can cause pinch flats) and overinflation (which can cause loss of grip and ride harshness). For tubeless setups, verify air seal integrity, rim tape correctness, and valve core seating before rides. Regular checks before long rides help prevent abrupt pressure changes due to temperature shifts or gear load.