How to Use a Tire Pressure Checker
Learn how to accurately measure tire pressure with a tire pressure checker, interpret readings, and maintain correct pressure for safety, fuel efficiency, and optimal tire wear.

By the end, you will know how to use a tire pressure checker to measure tire pressure accurately, interpret the gauge reading, and adjust air to the vehicle's recommended range. The guide covers choosing a gauge (analog or digital), locating the correct spec, taking measurements at cold tires, validating results with TPMS when applicable, and avoiding common mistakes.
Why tire pressure accuracy matters
Maintaining correct tire pressure is a foundational part of safe driving, tire longevity, and fuel efficiency. Using a tire pressure checker helps you verify that each tire sits within the manufacturer-recommended range. According to Tire Pressure Tips, consistent checks reduce uneven wear, improve handling, and minimize the risk of blowouts on the road. The goal is to establish a quick, repeatable routine you can perform at home or on the go. A reliable gauge paired with a routine helps you catch slow leaks before they become costly problems and gives you confidence in your vehicle’s performance during seasonal changes.
Types of tire pressure checkers
There are three common types of tire pressure checkers: digital gauges, analog dial gauges, and fixed sensors that feed TPMS data. Digital gauges provide a numeric readout and are easy to read in low light. Analog gauges use a small needle against a dial, which can be quicker once you get the hang of it. TPMS (tire pressure monitoring system) sensors provide vehicle-wide data, but they are not a replacement for manual checks because TPMS readings can lag or be blocked by temperature and driving conditions. For most drivers, a reliable digital gauge offers a balance of accuracy, ease-of-use, and durability, while still allowing cross-checks with the TPMS.
Understanding your vehicle's recommended pressure
Your car's recommended tire pressure is usually displayed on the driver’s door jamb placard or in the owner’s manual. The value is a recommended cold tire pressure, not a pressure to maintain after driving. The placard often shows a front and rear PSI (pounds per square inch) or kPa (kilopascals) value, which may differ by axle. If you drive a light truck, SUV, or a high-performance model, values can vary by tire size. Always verify that you are using the correct spec for your specific tire size and load conditions. Remember, these numbers assume cold tires and no heavy loading.
Preparing to measure: cold tires and environment
To get an accurate reading, measure when the tires are cold (the car has been stationary for at least 3 hours or you have driven less than a mile). Temperature affects air pressure; every 10 degrees Fahrenheit change can alter pressure by about 1 PSI. Choose a comfortable, well-lit location, and remove dust from the valve stems to avoid small leaks from debris. If you have just driven, wait and recheck after you let the tires cool to ambient temperature. If you cannot wait, acknowledge that readings may be slightly higher than the true cold reading.
Reading the gauge and interpreting numbers
When you press the gauge onto the valve stem, ensure a clean, tight seal. With a digital gauge, read the exact numeric value; with an analog gauge, estimate the nearest whole number. Compare the reading to your vehicle’s recommended pressure on the placard. Never inflate beyond the maximum printed on the tire sidewall, which is not the target pressure for normal driving. If a tire reads significantly low, inspect for leaks around the valve stem, beads, or tread area. If a tire reads high, you may have overinflated during a previous inflate.
Interplay with TPMS and manual gauges
TPMS provides a convenient warning if a tire is underinflated, but it does not replace the need for precise measurements with a tire pressure checker. Use TPMS as a supplemental alert and confirm with your gauge. If TPMS readings don’t match your gauge, re-check all four tires and consider the temperature and recent driving that could affect pressure. In cases of chronic loss, seek professional help, as leaks may be slow but persistent. Regular cross-checks improve reliability and confidence in your readings.
Common mistakes and how to fix them
Avoid common errors like measuring after driving, not sealing the valve stem, or rushing readings on a hot day. Always calibrate and maintain your gauge; digital gauges should be recalibrated periodically, and analog gauges can drift over time. Keep spare batteries if you use a digital model and store the device in a protective case to prevent damage. A small rag can help wipe off valve caps or stems to improve seal. If you encounter inconsistent numbers, test with a second gauge to verify accuracy.
Maintenance, storage, and gauge care
Care for your tire pressure checker extends its life and accuracy. Replace worn-out tips or seals, especially on digital models, and avoid dropping the gauge onto hard surfaces. Store in a cool, dry place away from direct sunlight and avoid exposing the device to moisture or extreme temperatures. Regularly check the calibration by comparing readings against a known standard or another reliable gauge. This simple maintenance protects accuracy and ensures consistency across checks.
Real-world scenarios and quick checks
In daily use, most drivers perform checks during routine maintenance or before long trips. If you notice one tire consistently reading low after a fill, inspect for leaks around the valve stem, bead, or tire sidewall. A routine that includes checking all four tires ensures even wear and balanced handling. When parked in cold weather, take readings promptly since temperature shifts can distort pressure values. A practical approach is to check each tire, record the numbers, and inflate or deflate to the spec after confirming the cold reading.
Quick routine for a monthly tire pressure check
Set aside 10–15 minutes for a complete check of all tires. Begin with cold tires, then inspect the valve caps for damage or dirt. Use your preferred gauge to verify numbers against the placard, and adjust air using a compressor or pump as needed. Re-check after inflation to confirm accuracy. A consistent monthly routine helps maintain optimal tire wear, fuel economy, and safety.
Tools & Materials
- Tire pressure gauge (digital or analog)(Choose a gauge with a clear readout and good sealing tip)
- Air compressor or portable pump(Preferably with a built-in gauge or dual pressure nozzle)
- Valve core tool or small wrench(Useful for checking valve cores if leaks are suspected)
- Clean cloth or rag(For cleaning valve stems and caps to ensure a tight seal)
- Owner’s manual/door placard(To confirm the correct cold PSI or kPa for your tires)
Steps
Estimated time: 15-25 minutes
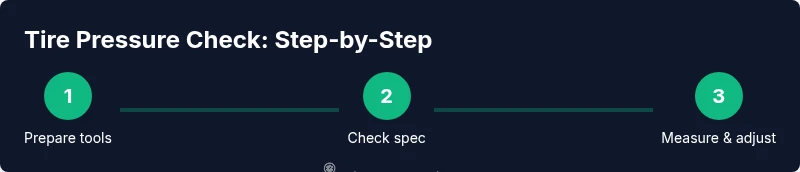
- 1
Prepare your tools and location
Gather your gauge and inflator in a well-lit area. Check that the car is off and the tires are cold. This ensures accurate readings and safe operation.
Tip: Keep the valve caps snug to prevent dirt entry. - 2
Find the correct pressure specification
Consult the door placard or owner's manual to locate the recommended cold PSI or kPa for each axle. Pressure may differ between front and rear tires or by load.
Tip: If you have different tires, use the spec for the tire size installed on that axle. - 3
Inspect and prepare tires
Visually inspect each tire for cracks, bulges, or embedded objects. Clean the valve stem and cap to ensure a clean seal with the gauge.
Tip: If the valve stem is damaged, do not measure; replace the stem before inflating. - 4
Measure cold tire pressure
Attach the gauge to the valve stem firmly and read the pressure without leaning on the tire. For analog gauges, note the closest whole number; for digital, read the exact figure.
Tip: If you suspect a leak, recheck after the tire has cooled for a few minutes. - 5
Inflate or deflate to spec
If the reading is low, add air in short bursts and recheck. If high, release air gradually and recheck. Avoid over-inflating beyond the recommended max.
Tip: Inflate in small increments to avoid overfilling. - 6
Re-check and confirm
Once you reach the target, recheck all tires to ensure consistency. This helps catch any gauge drift or recent temperature changes.
Tip: Record the final values for future reference. - 7
Cross-check with TPMS
If your vehicle has TPMS, compare the gauge readings with the dashboard warning. Minor discrepancies can occur due to temperature and sensor placement.
Tip: Don’t rely on TPMS as the sole method; use a gauge for accuracy. - 8
Store and maintain your gauge
Put the gauge back in its case or pocket after use. Check calibration periodically and replace worn components when necessary.
Tip: Avoid dropping the gauge or exposing it to moisture. - 9
Document and plan
Keep a small log of the readings and any changes you made. This helps track leaks or seasonal differences over time.
Tip: A simple notebook or phone note works well.
Frequently Asked Questions
Is it okay to check tire pressure after driving?
It’s better to check when tires are cold, because heat from driving raises the pressure and can give a falsely high reading.
Check when cold, since driving heats the tires and skews readings.
What is the difference between PSI and kPa?
PSI and kPa are two units for pressure. Most car placards use PSI, but some regions publish in kPa. Convert if needed and always compare to the correct unit on your placard.
PSI and kPa are units for pressure; use the unit shown on your placard.
How often should I check tire pressure?
Check at least once a month and before long trips; inspect tires for signs of slow leaks or damage during checks.
Check at least monthly and before long trips.
What should I do if TPMS and gauge readings differ?
Recheck both and consider temperature. If readings still differ, inspect for leaks and ensure the tires are cold when measuring.
Recheck and consider temperature; inspect for leaks if readings differ.
Can I rely on TPMS alone?
No. TPMS provides warnings, but your manual gauge gives exact pressure. Use both for accuracy.
TPMS warns you; your gauge confirms exact pressure.
What if my gauge reads zero?
That can indicate a faulty gauge or a fully defective valve. Try a different gauge and inspect the valve stem for leaks.
If the gauge reads zero, try another gauge and check the valve.
Watch Video
What to Remember
- Check cold tires first to ensure accuracy
- Use the vehicle spec on the placard for target PSI
- Cross-check with TPMS and manual gauge for reliability
- Inflate in small increments to avoid overinflation
- Maintain and calibrate your gauge regularly