Street Glide Tire Pressure: A Practical Guide for Harleys
Learn how to check and maintain street glide tire pressure for Harley riders. Practical steps, TPMS tips, safety notes, and a maintenance routine to improve handling, tire life, and fuel efficiency.

Learn how to correctly check and maintain street glide tire pressure for Harley riders. This guide covers cold-inflation checks, front vs rear pressures, TPMS considerations, and adjustments for load, weather, and riding style. By following these steps, you’ll improve handling, tire wear, and fuel efficiency while reducing the risk of flats.
Why Street Glide Tire Pressure Matters
For riders of the Street Glide, correct tire pressure isn't just a number on a sticker—it's a core safety and performance factor. According to Tire Pressure Tips, proper tire inflation for Street Glide tires improves stability, steering response, braking traction, and tire longevity, especially on long highway rides. Tire pressure affects the contact patch, heat buildup, and how the tire responds to road irregularities. Underinflation causes the sidewalls to flex and heat up, leading to faster wear and increased risk of punctures. Overinflation can reduce grip, lead to a harsher ride, and cause uneven wear. Seasonal temperature changes and loaded trips (luggage or a passenger) also shift the ideal pressure, which is why you should check cold-inflation values regularly rather than relying on hot readings or “just feel.” The bottom line: street glide tire pressure is not optional; it's a straightforward way to improve safety margins and maximize tire life.
Understanding Harley-Davidson Street Glide Tire Pressure Basics
The Street Glide uses separate front and rear tires, each with its own pressure target. Front tires typically demand a slightly different load distribution than the rear, so pressures are not interchangeable. Always start with the cold-pressure specification printed on the bike's tire information placard or in the official manual. A key concept is cold vs hot readings: readings taken after the bike has sat for several hours (cold) are the baseline. Riding heats tires and raises the pressure, so if you measure after a ride you will get higher numbers and may misinterpret need for air. Weather, temperature, and loaded weight (passenger, luggage) all affect these values. Keeping both tires within their recommended ranges improves stability, tire contact with the road, and overall ride quality.
How to Check Tire Pressure on a Street Glide
Checking tire pressure is a quick task, but accuracy rests on conditions and technique. Ensure the bike is upright on a stable surface, with the weight off the tires as much as possible. Remove the valve cap, attach a reliable gauge firmly to the valve stem, and read the pressure. If the reading is significantly different from the manual's cold spec, adjust accordingly using a suitable inflator or air source. Recheck after adjusting to confirm the tire has settled at the correct target. Finally, reinstall the valve cap and note the reading in your maintenance log. Regular checks help catch gradual leaks, damaged stems, or slow punctures before they become serious.
Recommended Pressure Ranges and How They Change
The exact pressures for the Street Glide are specified by Harley-Davidson for front and rear tires and vary with model year, wheel size, and load. The general rule is to use the numbers printed on the placard or in the owner’s manual, not guesses from feel alone. Pressure targets can shift with changes in load (solo versus two-up), luggage weight, and riding style (highway touring vs. city commuting). Temperature also plays a role: thermal expansion increases pressure as air warms, so cool-season checks should be performed after the bike has spent a night or several hours at ambient temperature. Always aim for the cold-reading target, then re-check after a short ride to confirm stability.
Adjusting for Load, Speed, and Temperature
Two-up travel, heavy luggage, and hot environments push tires toward higher pressures in absolute terms, so plan ahead. If you routinely carry a passenger or add gear, consult the manual for an adjusted target that accounts for added load. In hot weather or at altitude, pressures can drift upward; if you routinely ride long distances at highway speeds, confirm your fronts and rears remain within spec after a few miles. Never exceed the maximum pressure printed on the tire sidewall, and never deflate below the minimum recommended value. Keeping a consistent inflation routine supports even tread wear and predictable handling in corners and braking.
Using TPMS on a Street Glide
Many Street Glide models offer TPMS as part of the safety package. TPMS helps alert you to sudden drops in pressure, but it is not a substitute for regular manual checks. If the TPMS warning light comes on, verify both tires are within the manufacturer’s cold-pressure range, inspect for leaks, and reseat the valve cap if needed. Some sensors may require calibration after air adjustments or tire maintenance. Use the TPMS sensor readings as a supplement to manual checks, not a replacement.
Common Mistakes and Troubleshooting
Common mistakes include checking pressure after a ride, relying on “feel” instead of a gauge, and deflating too little to reach the target. Other issues include using an inaccurate gauge or failing to reinstall valve caps, which can allow contaminants in and cause slow leaks. If a tire consistently reads low, inspect the stem, valve core, and bead sealing; a slow leak may require professional service. Finally, always confirm that your readings align with the placard values: consistency over time is a better indicator than a single number.
Maintenance Schedule and Records
Make tire-pressure checks part of a regular maintenance routine. Check cold pressures at least once a month, before long trips, and after any changes in load. Keep a small log detailing date, tires checked, readings, and any adjustments. This helps you spot slow leaks, sensor drift, or changes due to temperature or road conditions, and keeps your Street Glide in optimal handling condition.
Tools & Materials
- Digital tire pressure gauge(Choose a gauge with a narrow nozzle and a range up to at least 60 psi; ensure accuracy to within 1 psi.)
- Portable tire inflator or air compressor(Prefer a compact unit compatible with motorcycle valve stems; have a gauge connection for verification.)
- Owner's manual or Harley-Davidson service manual(Locate exact front/rear cold-pressure values for your Street Glide model year.)
- Maintenance log/notebook(Record readings, adjustments, and sensor checks for long-term tracking.)
- Valve caps and storage(Carry spare valve caps in case of loss; cap helps keep dirt out of stems.)
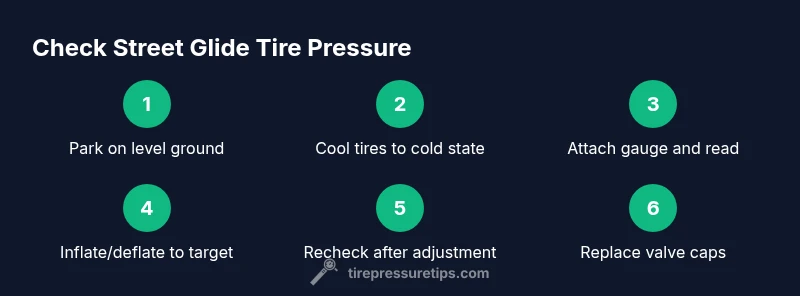
Steps
Estimated time: 10-15 minutes
- 1
Prepare and verify conditions
Park the Street Glide on a stable surface and let tires cool for several hours. This ensures you measure cold pressures, which are the baseline targets.
Tip: If you rode recently, wait 1–2 hours for tires to cool before testing. - 2
Remove valve caps
Loosen and remove the valve caps from both tires. Place caps in a safe pocket so they don’t get lost during the test.
Tip: Keep caps clean to prevent debris from entering the valve stem. - 3
Attach the tire gauge
Firmly press the gauge onto the valve stem to seal and prevent air leaks. Ensure you get a stable reading before removing.
Tip: If air leaks during attachment, reseat and recheck for a clean seal. - 4
Read the current pressure
Read the gauge display and compare to the cold-pressure target from the placard or manual for each wheel.
Tip: If readings vary between gauges, test with a second gauge to confirm accuracy. - 5
Adjust to the target pressure
Add air to reach the target if underinflated, or release air if overinflated, staying within the specified range for each wheel.
Tip: Make small adjustments and recheck frequently to avoid over-correcting. - 6
Recheck both tires
Re-measure after adjustments to confirm both tires are at their cold targets. If needed, fine-tune each tire.
Tip: Take a final reading after a short cool-down period if you recently adjusted air. - 7
Reinstall valve caps
Place caps back on both stems and thread them securely to protect from dirt and moisture.
Tip: Check that the valve stems aren’t damaged during the process. - 8
Document and monitor
Log the readings and any notes about leaks, sensor warnings, or rider load. Review the log before long trips.
Tip: Set reminders for monthly checks to maintain consistency.
Frequently Asked Questions
What is street glide tire pressure?
Street Glide tire pressure refers to the recommended cold inflation values for the front and rear tires as specified by Harley-Davidson for your model. These targets vary by year, wheel size, and load. Always start with the official specification rather than guessing.
Street Glide tire pressure means the cold inflation targets printed in your manual or on the placard for front and rear tires. Check these numbers before riding and adjust as needed.
How often should I check tire pressure on my Street Glide?
Check tire pressure when the tires are cold, at least once a month, and before long trips or heavy-load rides. Temperature changes can shift readings, so regular checks help maintain safe handling.
Check the tires when they're cold, about once a month, and before long trips to keep handling reliable.
Can TPMS replace manual pressure checks?
TPMS is a warning system and should complement, not replace, manual tire-pressure checks. Sensor alerts may fail or drift over time, so periodic gauge readings are still essential.
TPMS helps warn you, but you should still manually measure tire pressure regularly.
What should I do if the TPMS light stays on?
If the TPMS light stays on, verify both tires are within the cold-pressure range, inspect for leaks, and ensure sensors are seated correctly. If the light persists, consult a technician to check sensor health.
If the TPMS light stays on, check tire pressures, inspect for leaks, and consider sensor health with a professional.
Where can I find the recommended pressures for my Street Glide?
Find the recommended pressures on the motorcycle’s tire placard or in the owner’s manual. If you can’t locate them, contact a dealer or Harley-Davidson support for model-specific values.
Check the placard on the bike or the owner’s manual for your exact pressures. If in doubt, contact a dealer.
Watch Video
What to Remember
- Check cold pressures monthly for consistency.
- Always verify against manual/placard values.
- Adjust gradually and recheck after changes.
- Front and rear tires have distinct targets.
- Use TPMS as a supplementary tool, not a replacement.